Elevators to rudder

Sunday 30th March 2008 (3hr 40min)


Pop-riveted right elevator bottom skin to spar. Riveted on right elevator counterbalance skin. Riveted both end ribs to top and bottom skin except last three rivets on each run. Drilled out and replaced faulty rivets in rudder skins. Assembled rudder skins on rudder skeleton. Installed R710 rudder brace. Riveted rudder skeleton to skin.


I borrowed my pal Bryan Sheane's 4" thin-nose-no-hole ("4TNNH"?) yoke and his longeron yoke for the jobs I had to do today. It is becoming clear that these tools are essential, whether you have a hand squeezer and (or) an air squeezer. So, I ordered my own from Avery's. They should be here within 2 weeks by Express parcel post.

The manual and lots of builders sites will give you the impression that pop-rivets are the only solution for at least some of these holes. However, the longeron yoke made short work of them all and every rivet is perfect - Don't hesitate, get yourself one of each of these great tools!


Elevation

Saturday 29th March 2008 (5hr 5min)

Riveted VS skin to forward spar and mid-span rib. Riveted in VS-706 tip rib VS-704 root rib and VS-705 nose rib. Replaced bad rivets in rear spar assembly and riveted it in place. Levelled table, drilled out and replaced bad rivets on left elevator top and bottom skin stiffners. Riveted top skin to the spar. Weighted left elevator and pop-riveted main spar to bottom skin. Riveted E-905 root rib and E-907 trim spar to bottom skin. Replaced faulty rivets in right elevator stiffners.

Dorothy and I continued our riveting partnership by completing the internal skin to spar and mid span rib rivets. I then inserted the two root ribs and completed the riveting of these plus the rear spar and the tip rib after fixing some bad rivets in the rear spar assembly that had been identified in the inspection. Being mostly around the edge of the skin, these rivets were easy. Only the three rivets through the two root rib flanges and the forward spar were a little tricky but the air squeezer easily got these done as the access is much easier that the similar joint at the root of each elevator.


Mick Bevin (my inspector) had suggested replacement of a number of rivets in the elevator stiffners. These had been put in before I realised the importance of adjusting pressure on the rivet gun and I had mashed some rivets by using too much pressure. Drilling out rivets is something you get a lot of practice at and I can generally get them out without touching the hole. Still, the process of setting the original rivet stretches the hole so you need a fatter replacement rivet. One way of making a fat rivet is to pre-squeeze a rivet of the next length up so that the shank expands and shortens. This will fill up the slightly enlarged hole. Doing this with an air squeezer is not easy but it is one way of developing a sensitive trigger finger.


I put on the elevator horn without any problem and then went on to rivet the elevator top skin to the spar. About 3-4 rivets either side of the hinge openings could be reached with the 4in thin-nose yoke.


Next, I weighted the elevator in the closed position with building sand divided among several of Dorothy's freezer food bags. Some people go to great lengths to get solid rivets through the bottom skin into the spar. I just went with the Vans suggestion and pop-riveted the join. Maybe I should have tried harder as the results were not wonderful, with a depression around each rivet. Good thing they are on the bottom. While the elevator was weighed down, I also riveted the root rib to the top and bottom skin and the trim spar to the bottom skin.

The trailing edges did not initially lie exactly on top of each other and had to be pulled into alignment and clamped using side-jaw clecos. This makes we worry about twist. Some builders have reported that they have perfectly straight trailing edges but with the two trailing edges aligned with each other only one elevator horn lines up with its elevator while the other one is well off. The solution seems to be to undo the end rib rivets and/or the trailing edge rivets, get everything into alignment while weighted down and re-rivet. I hope to avoid this by riveting both elevator trailing edges while mounted to the HS assembly and held 'in trail'.

On to the Vertical Stabiliser!

Friday 28th March 2008 (1hr 45min)

Prepared & primed R710 rudder brace. Assembled VS skeleton & skin in blocks.

I seem to be jumping around quite a lot from one assembly to another. A prime example was this evening when I worked on one rudder piece before going on to the vertical stabiliser.

I avoided the previous mistake (not leaving enough edge distance on the R-710) and cut strictly along the line from one guide hole to the next. For sure, there are no edge distance issues this time! After prepping the edges and cleaning/etching, I applied two coats of primer. It was not worthwhile getting out the spray booth for just one part so I used a paint pad to apply the primer. My pal Byran is applying all his primer in this way and is very satisfied with the results. I could see brush marks in the brace after it dried so I think I will stick with spraying. In any case, part of the point in spraying the primer was to acquire good spray painting skills by the time I come to put final coat paint on visible bits such as the cockpit interior.

In assembling the VS skeleton, I departed slightly from the Vans manual (temporarily ignoring the big lesson from last weekend) and followed George Orndorff's method instead. George feels that leaving off the root ribs (both the VS-704 main rib and the VS-705 nose rib) to improve access for rivetting the VS702 main spar and VS-707 mid-span rib to the skins. This could be further improved by also leaving off the VS-706 tip rib except that solid rivets are called for to attach this to the tip of the VS-702 main spar. However, I was determined to stick to somebody's method if not Van's so I riveted the tip rib on as per George's video.


First main assembly completed - at a cost!

Monday 24th March 2008 (7hr)

Riveted R-HS top skin. Riveted inner H904 tip rib on left HS. Replaced rivets on inboard left HS rib-spar-shim-inner nose rib join. riveted outboard right HS nose rib to spar. Riveted in left HS inboard/outboard main rib. Riveted rear spar to skins and inboard/outboard main ribs.

Dorothy joined me again today to finish out the riveting of the skins. We did the right HS top skin and went back over any rivets that did not pass muster.

At this point I made one of my regular screw-ups. I riveted in the inner main ribs, beginning with the skin-rib rivets along the inboard edge of the skin . What I should have done was to begin with the nose rib-spar-shim-main rib rivets while the main rib was still mobile. The reason is that the main rib is angled inwards towards the aft end and it is very hard to get access to its forward flange. If the aft end of the main rib can be pushed back to a 90 degree angle or beyond, it would be easy to get the air squeezer in here, at least with a longeron yoke. As you can see from the first photo, I tried to access it with a double offset rivet set in the gun. This worked okay on 5 of the six rivets (though it caused a lot of scratching to the primer and one or two of them had to be done a second time). However that last rivet in the corner just wouldn't set right. When the third rivet in the same hole bent over, I abandoned it and put a rivet in a new hole right next to it - leaving plenty of edge distance.

What annoyed me most was that I had two chances to avoid this problem and missed both of them. Of course I should have followed the Vans assembly sequence more closely in the first place but, when I came across the difficulty in accessing these six rivets, I should have bitten the bullet and drilled out all the skin-rib rivets to go back to the Vans way of doing it.

I will have to see what the inspector says but if he agrees with my fix then at least the entire unsightly area will eventually be covered by the emp fairing. In the meantime, it is going to be staring at me for the rest of the project and saying "BE VERY CAREFUL IF YOU DEPART FROM THE VANS MANUAL".

Perhaps I should not have done it but I went on and riveted in the aft spar, which carries the elevators. This requires more pop-rivets into the aft flanges of the internal main ribs and solid rivets to the inboard and outboard ribs as well as the trailing edge spar-skin rivets. All of these were easily done with the air squeezer but I was not enjoying the process because of my black mood and barely celebrated the completion of the first recognisable part of the aircraft.

Easter bonnet

Sunday 23rd March 2008 - Easter Sunday (3hr 25 min)

Riveted right bottom HS skin. Riveted in aft spar and left HS 904 tip rib.


Easter fell very early this year - the weekend following St Patrick's day. I suppose we should have taken advantage of it and gone away for a break. However, Dorothy drives to see her mother most Sundays (leaving me to get a long spell of work on the plane) but every Easter her mother goes to visit other relatives and the break that Dorothy wants is NOT to go anywhere. Of course, I was happy to oblige and suggested that we spend an hour or so on the riveting job. Well, that's probably not how she saw her Easter Sunday working out but she was 'up for it' and played her part, if not happily then at least without verbal dissent.

There's been a lot of talk on forums recently about RV divorces. Apparently building an RV often contributes to marriage problems. In my view, no aircraft or any other hobby is worth that much pain and I have no intention of joining the ranks. So I'm trying to strike a balance and keep the project out of the way of family life as much as possible. One idea is to restrict weekend working to just one of the two days and being available either for DIY, shopping or whatever on Saturday, or else ocassionally visiting my mother-in-law with Dorothy on the Sunday - whichever she prefers. Another idea is to take long breaks between the kits. We have been planning a big re-modelling on our reception rooms - which is a project dear to Dorothy's heart. We normally do all of this kind of work ourselves so I intend to begin that when the emp is finished and complete it while the wing kit is on the high seas so that I am ready to start straight in when it arrives.

Anyway, back to today's action. I got the aft spar on and pop-riveted to the internal main ribs. I also put in the solid skin-spar rivets on the trailing edge and riveted in the left tip rib. All of these solid rivets are accessible to the air squeezer, making it easy, pleasant and fast work.

Nose out of joint

Saturday 22nd March 2008 (7hr 10min)

Finished riveting right mid nose rib. Riveted left HS nose ribs. Replaced faulty rivets on forward spar. Assembled both HS with clecos. Pop-riveted internal main ribs to forward spar. Riveted left skin to spars and ribs. checked rivets and replaced faulty ones.


Things went no better with the right mid-span nose rib - some scratches to the internal primer but looks okay from the outside. The scratches are not deep and really only amount to the removal of the primer. I don't see any need to obsess about them. I just applied a little primer with an artists brush and moved on.

Now that it is time for the forward spar, I made an extra set of cradles so that I can support both HS at the same time, with the forward spar (and eventually the aft spar) running between them. I felt this was much better than doing one HS with the spars hanging out in mid air and needing to be supported to avoid unnecessary stresses being into the structure.

Before the forward spar went in, I riveted the "intermediate" main ribs to the aft side of it. These are the ribs that have no nose rib sharing the same rivets. Mine were numbered 1 to 10 from left to right (looking forward) and the ribs involved were numbers 2, 4, 7 and 9. The air squeezer (I'm getting tired of typing "pneumatic") earns its keep here

Next step was to pop-rivet the main rib that goes behind the mid-span nose rib. This gets pop-riveted to the forward spar and the aforementioned nose rib. This required me to angle the main rib to one side (with clecos through two of the three holes) so that I could get the pop rivet puller into position.

My wife Dorothy helped me with shooting the skin rivets on the forward spar and main ribs. She smiled when I asked her for her help as she knew I was reluctant. "Did you think I would say no?" she replied. Dorothy is meticulous in everything she does and I couldn't hope for anyone better as a riveting partner. For someone that is not too thrilled about aviation in general and this project in particular, she did the job like a trooper and we got a very good result.


Good Friday

Friday 21st March 2008 (3hr 50 min)


Levelled benches for HS assembly, Riveted in the mid-span nose ribs and end ribs.


That mid span nose rib on each HS is notorious and regularly causes problems. I chose my smallest bucking bar so that I could position it properly . Even then, I could only hold the bucking bar in place with my finger tips and I could not stop it scratching against the primer on the skin or on the rib itself. Since then, I have seen where another builder cuts one inch rings from an old bicycle inner tube and stretches them over his bucking bars to protect the surrounding metalwork - sounds like a great idea. I used the flat mushroom set in the rivet gun and put some magic tape over the manufactured head.

You can see from the second photo that the primer has been scratched by the bucking bar but the rivets look okay from the outside so I am not too bothered. Nonetheless, I have ordered a new bucking bar from Avery along with a few other items that I need, as this problem will come up again. It won't get here in time for the other HS however.

The end ribs were a piece of cake as all the rivets can be squeezed with the pneumatic squeezer.

First Inspection

Wednesday 19th March


First inspection. All assemblies passed fit for purpose.

My inspector Mick Bevin came along this evening. I had prepared all the assemblies up to the point where the next step involved closing them up and hiding the internal riveting. He went over every rivet, marking pretty much every one that I already knew was dodgy. I had left them there to get a feeling for what would pass and what would not.

We also talked about a number of the big decisions later on in the project such as fuel injection, electronic ignition and wobbly props. Mick is a traditionalist and likes to keep it simple. He pointed out that it is not just the cost of purchasing but the expensive and regular maintenance on some of these systems that you need to watch out for.

He encouraged me to consider getting the tanks built professionally. Another of his 'clients' - a group of Irish Air Corp personnel - had a lot of trouble with leaks and found them very difficult to solve. I had checked the position the last time he mentioned this and found that Vans no longer offer this option but they recommend Evan Johnson who builds them to order in Callifornia. They just ship the parts to him and he ships the finished tanks back to Vans where they are forwarded on to the customer with the rest of the wings order. Based on Mick's urgings, I decided to go with it and got in touch with Evan the same evening. He is a great guy who likes to talk RVs and seemed tickled that two of his tanks would be going so far afield. He is building a 10 of his own.

In the end, he completed my log book without reservation and passed all assemblies fit for purpose. Now I can get on with closing up these beauties.

I won't need to see Mick again until I reach the same stage on the wings - just before I begin to close up any of the parts and hide rivets. At that stage, he will also have a look at the rest of my work on the emp.

Sorry, no photos. I was too excited. I will get Mick's photo the next time he comes around

St Patricks day parade

Monday 17th March 2008 (8hr 15min)
Drilled out and re-riveted faulty rivets from R606pp reinforcement plate, R902 spar, R904 rib, R405PD. Set up for riveting right elevator skin and spar. Riveted right and left elev skins to top of E902 right and left spars. Attached right and left elevator counterbalance assembly to E902 right and left spars. Assembled HS front and rear spars.


Our national holiday and what am I doing? making a plane! Well, that is my kind of holiday. Contrary to the public stereotype, I don't drink much and I drink Guiness only rarely - usually when I feel called upon to prove that I AM Irish.
The long nose yoke was able to reach three to four rivets either side of the hinge openings in the elevators. That left only about a third of the holes along the bottom of the spar to be pop riveted.

Counterbalance & corrections

Saturday 15th March 2008 (2hr 40min)

Dimpled holes in the end tabs of the trim tab. Riveted the counterbalance assembly for both elevators. Riveted rudder counterbalance assembly. Drilled out mashed rivets on rudder skins and elevator skins and re-riveted them.


I borrowed a long-nose no-hole yoke and a longeron yoke from my pal Bryan (QB7). I really did not fancy bucking inside a restricted space such as the rudder counterbalance arm. These yokes made the job easy. The only difficulty was in getting the longeron yoke over both flanges of the elevator counterbalance arm. The trick here was to remove one of the rivet sets. There is plenty of space to put it back in once the yoke is in place inside the flanges.

The Bends at the Ends

Thursday 13th March 3hr 15min

Ordered replacement R710. Made new blocks. Practiced and then completed trim tab end bends. Match-drilled end tabs. Assembled bending break and completed trailing edge bend.


I found that I had edge distance problems with the R-710 rudder brace, as can be seen from the photo. This happened because I didn't like the half holes left after trimming off the cheeks and I ground down the edges until they were completely gone. The cut lines are supposed to go between the CENTRES of these guide holes. Fortunately, I had left the spray booth in place so it was not difficult to prime up the new part.
The infamous trim tab end bends went much more smoothly this time. Firstly, I made much wider blocks to hold the skins for the bend. Secondly, I used double-sided tape (the white take in the photo. to make sure the skins stayed put in the blocks while the bending was going on. Thirdly, I left out the rivet gun shown in the manual and made the bends by pushing on the tabs with a piece of scrap wood. The resulting bends could be a little sharper but they are in the right place at least and they don't look as if they were beaten with a crow-bar.
I wouldn't use that particular type of double-sided tape however. It consists of a thin layer of foam with a glossy paper layer on each side that you pull off when you are ready to use it. The problem is that the glue is much stronger than the foam tape itself and it was really difficult to get off, particularly inside the trailing edge where access was difficult.

Rivetting Performance!

Wednesday 12th March 2008 3hr 30 min


Rivetted E-910 reinforcing plates, platenuts, E-905/E-906 root rib and WD-605-R/L elevator horn weldments to the E902 left and right elevator spars. Rivetted E907 trim spar and E-921 Gusset to the E-905 left elevator root rib.


I got some advice from Glenna in Isham inc (http://www.planetools.com/) about my air squeezer problem. She said rivet call-outs can be wrong on Vans plans. Because the squeezer only develops full pressure right at the end of the stroke, if the rivet is too long, the moving die meets the rivet and is stopped before this full-power stage of its stroke. This is correct and it was contributing to the problem but it was not the main cause. At the time, I was trying to set a shop head inside and below the flange of the elevator spar, which is a channel section. For some reason, I wanted the body of the squeezer and the moving dimpled die on the 'outside' of the channel section (instead of reversing the dies and using the squeezer from the inside) so I needed the flat die to stand out sufficiently from the yoke to clear the flange when the squeezer was closed. . Given what I was trying to do, the ideal tool would have been a longeron yoke but I tried to replicate the effect by choosing my tallest flat die and shimming it out further with shim washers. The result was that the dies were closing on the rivet long before the moving set holder had reached the full-powersection of it's stroke. the solution was simple - choose the next shortest rivet, reverse the dies so that the dimpled machine head die goes on the flat 'outside' of the channel, close the trigger gently to ensure the flat die is centred on the unformed shop head as it closes and voilá the perfectly set rivet every time!

Since this episode, I have been doing little calculations to check that the correct length of rivet is being called - my whiteboard is covered with them. Later, I got wise and began to use the rivet guage that came with the tool kit.

Elevation

Sunday 9th March 2008 5hrs 35min

Rivetted the stiffners to both elevator skins. Rivetted platenuts to E-615PP trim access reinforcing plate and riveted the plate to the left elevator skin. Rivetted the EET-602B trim servo mounts to the E-616pp trim cover plate.

I had to assemble most of the left elevator with clecos to match-drill the E908-R stiffner, which closes off the elevator next to the trim tab in contact with the E-908-L stiffener opposite on the bottom skin. This had been left out. I also dimpled these holes and painted primer in the bore of these newly enlarged holes as well as touching up various scratches in the primer on the rudder spar.


The pin in the end of the back rivet set that retains the plastic collar is disintegrating. Two pieces broke off it and it is now barely effective. I don't think it is worth going back to planetools.com about it, though I should. The part is easily available locally so I will just get it and pop it in myself - less hassle in the end and I want Glenna to focus on my air squeezer problem.


Rudder Assembly

Saturday 8th March 2008 4 hrs

Back rivetted stiffners onto both rudder skins. Rivetted the hinge reinforcing plates, rudder horn, shim, bottom rib and counterweight rib to the R-902 spar.

I missed the back rivet plate 3 times! As the plate is recessed into the bench top and is flush with the surface, this is easy to do but that's no excuse. At least it mostly did no harm to the skin or stiffner. However, one of the rivets was at the very edge of the plate and the skin was very slightly damaged as the rivet went over at an angle.
It is almost invisible except if you were looking for it so I will let it pass. I thought the skins came out very well. I had left the cut the blue vinyl only where a stiffner or spar would contact the inside of the skin. When the rest of the vinyl was peeled off, it looked good. I think I will use this technique more extensively on the wings as there is not much point in priming areas of alclad aluminium were no other part is in contact.
Our national rugby team were playing Wales at home today and expected to win. Unusually, I had the promise of a ticket so I took myself off after an early session of only one hour. I should not have bothered. After 20 minutes of dominance, they just faded away and were beaten by a late penalty kick. I was sitting there in our magnificent new stadium at one of the sporting highlights of the year thinking how much I would rather be back at my shop working on the plane.

Back to work and the air squeezer won't set the rivets. I had to hand buck in the end, which I found very difficult, particularly in the awkward spaces around the rudder horn.. I had to drill out severalrivets but the results were okay in the end. The primer is getting scratched in places with all of this hand bucking. I intend to use an art brush to touch up these little scratches, as well as coating the bore of holes that have to be match-drilled after priming.

I really have to sort this air squeezer out. It is far too important a tool to just dump there. Besides, I don't have a hand squeezer. I will contact Glenna at Planetools.com tomorrow so she sees it first thing on Monday.

First Rivets!!!

Friday 7th March 2008 4hrs
Assembled and riveted VS rear spar. Rivetted top rib and mid rib to fwd spar. Clecoed skin to fwd skeleton parts. Taped skin rivets in place on both rudder skins and placed stiffner ready for riveting.

After 187 hours and 25 minutes working on the project, I finally get to drive my first permanent rivet. I guess my approach of prepping everything and then priming everything before finally assembling anything must be unusual. Most other builders seem to start riveting as soon as they can because that's what building a metal plane is all about.
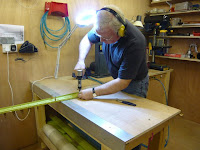
The very first rivets were a very big deal. They were set by back riveting. The shop heads were not totally perfect but acceptable. I switched to squeezing universal head rivets with the pneumatic squeezer. The importance of getting the tool (rivet gun/bucking bar or air riveter) square to the work was obvious once again. I had to shim out the 1/8 cupped die to clear the spar flange. A longeron yoke would have been better. I notice George Orndorff has a longeron yoke fitted to his squeezer throughout his videos.


When it came to the setting AD470 AD4 in the longer 6 and 7 lengths (to attach the rudder hinge brackets to the spar and doubler, I had the same problem with the squeezer again. There was no way it would do it. I bucked them instead and produced a beautiful smiley with my very first rivet. Not a big problem - one minute with the drill and punch and I had a still-perfect empty hole with which to start again.


I notice some oil from the rivet gun getting all over the primed surfaces. I only put two drops in each evening - you wouldn't think it would produce such a noticeable mess

Practice makes perfect

Tuesday 4th March 2008 1hr 40min

Used scrap to practice riveting using bucking bar and gun and pneumatic squeezer.

The rivet squeezer needs as much pressure as it is allowed (90psi), otherwise it can fail to squeeze the rivet at all. I also seem to need to set the gap between dies much tighter than the calculations would suggest if th eshop head is to be made within limits according to the rivet guage. I found the best way to do it is to place the cupped set on the manufactured (domed) head and hold it there with a finger while paying close attention to the flat die and watching it while the trigger is pressed, positioning the squeezer so that it is square and th eflat set will hit the rivet dead centre, otherwise the head will be angled.

bucking was easy enoubh, though the bucking bar did slip off once or twice creating an unacceptable shop head.